Oh, pickles! There’s just something so comforting and, dare I say, *satisfying* about whipping up a batch of your own. For me, it goes way back – summers spent at my aunt’s house, endless burgers on the grill, and her secret stash of bread and butter pickles. They were sweet, tangy, and always disappeared way too fast! That’s why I’m so excited to share this Irresistible Bread And Butter Pickles Recipe To Try Today. Seriously, if you’ve ever thought making pickles was too much fuss, this recipe will change your mind. It’s surprisingly simple, and the taste? Pure pickle perfection. Get ready to elevate your sandwiches, burgers, and basically anything else you can think of!
Why You’ll Love This Irresistible Bread And Butter Pickles Recipe
Honestly, I’m a little obsessed with how easy and delicious these pickles turn out. Here’s why you’ll be hooked too:
- Super Simple to Make: You don’t need to be a canning expert! The steps are straightforward, and I promise, even if you’re a little nervous about pickling, this recipe is totally doable.
- That Perfect Sweet and Tangy Flavor: Oh, the taste! It’s that classic bread and butter pickle vibe – a little sweet, a little tangy, with just the right amount of spice. It hits all the right notes!
- Seriously Versatile: These aren’t just for burgers (though they are AMAZING on burgers!). Think tuna melts, charcuterie boards, potato salad, or just straight out of the jar with a fork. They make everything better!
- So Satisfying to Make: There’s a special kind of pride that comes from opening a jar of homemade pickles. It feels so rewarding, and you know exactly what went into them.
- Great for Gifting: Making a big batch is easy, and pretty jars of these pickles make the most thoughtful DIY gifts for friends and family. Just saying!
- Customizable: If you’re feeling adventurous, you can tweak the spices a bit to make them *your* perfect pickle. Maybe a little extra dill or a pinch of something spicy? You’re the boss!
Gather Your Ingredients for Irresistible Bread And Butter Pickles
Alright, let’s get our ducks in a row! To make these amazing bread and butter pickles, you’ll need to gather a few things. Don’t worry, most of them are pantry staples. Here’s the rundown:
- About 3 pounds of cucumbers, sliced up nice and thin.
- 2 big onions, also sliced thinly.
- 1/2 cup of kosher salt – this is key for drawing out moisture!
- 1/4 cup of pickling spice is a must for that classic flavor.
- 1 teaspoon of mustard seed to add a little zing.
- 1 teaspoon of celery seed – trust me on this one!
- Just 1/2 teaspoon of turmeric for that pretty yellow color.
- A little pinch, about 1/4 teaspoon, of red pepper flakes for a tiny bit of warmth.
- 3 cups of white vinegar – full strength is best here.
- 2 cups of good old granulated sugar – yes, it’s a lot, but that’s what makes them sweet!
- And finally, 2 tablespoons of cornstarch to help thicken things up.
Step-by-Step Guide to Making Irresistible Bread And Butter Pickles
Okay, get ready to roll up your sleeves because we’re about to make some magic! This is where the satisfying part really kicks in. Don’t worry, it’s not complicated at all. Just follow these simple steps, and you’ll have jars of pure deliciousness in no time. For an extra touch, don’t forget to check out these delightful pickled onions for inspiration on other homemade goodies! Trust me, the aroma alone when these are simmering is totally worth it!
Preparing the Cucumbers and Onions
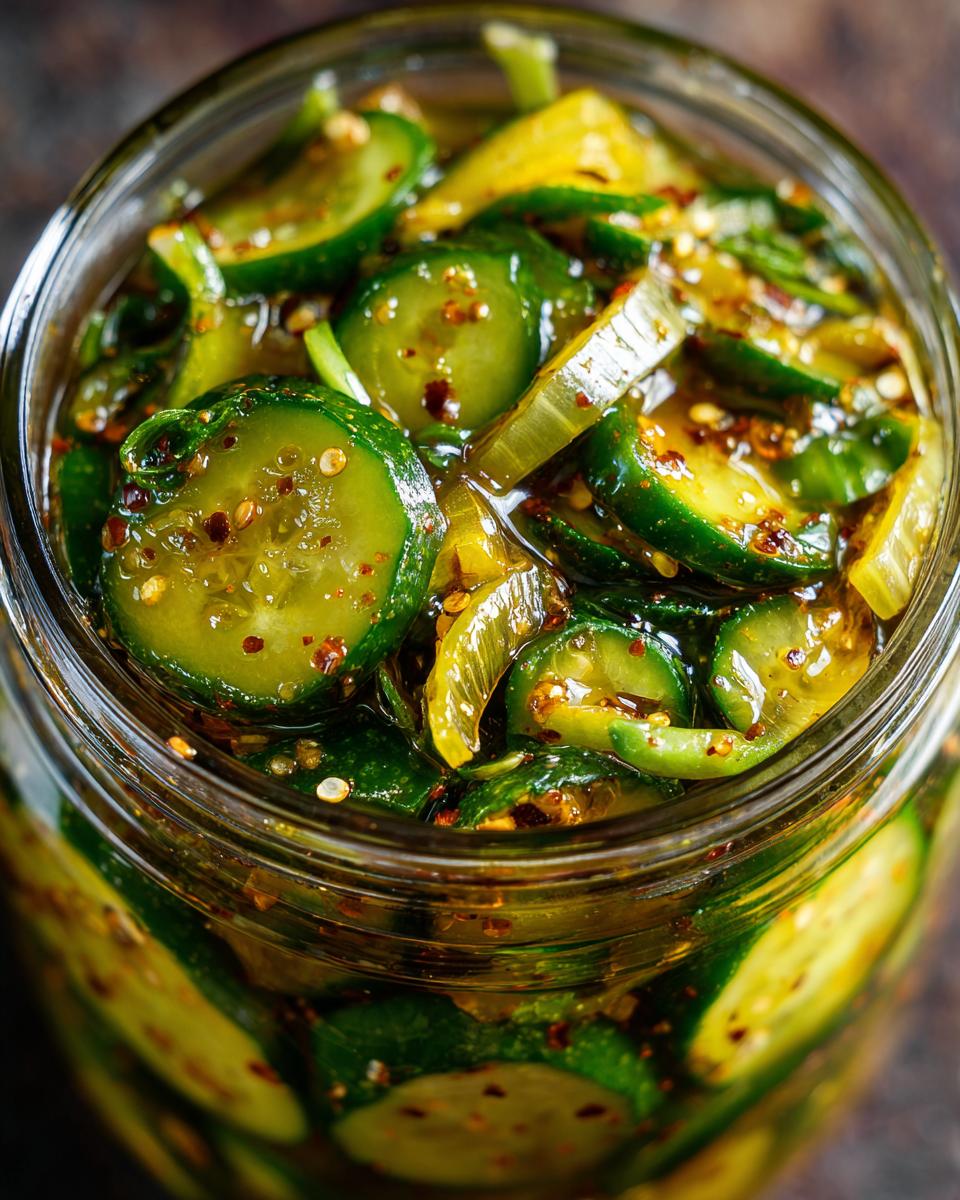
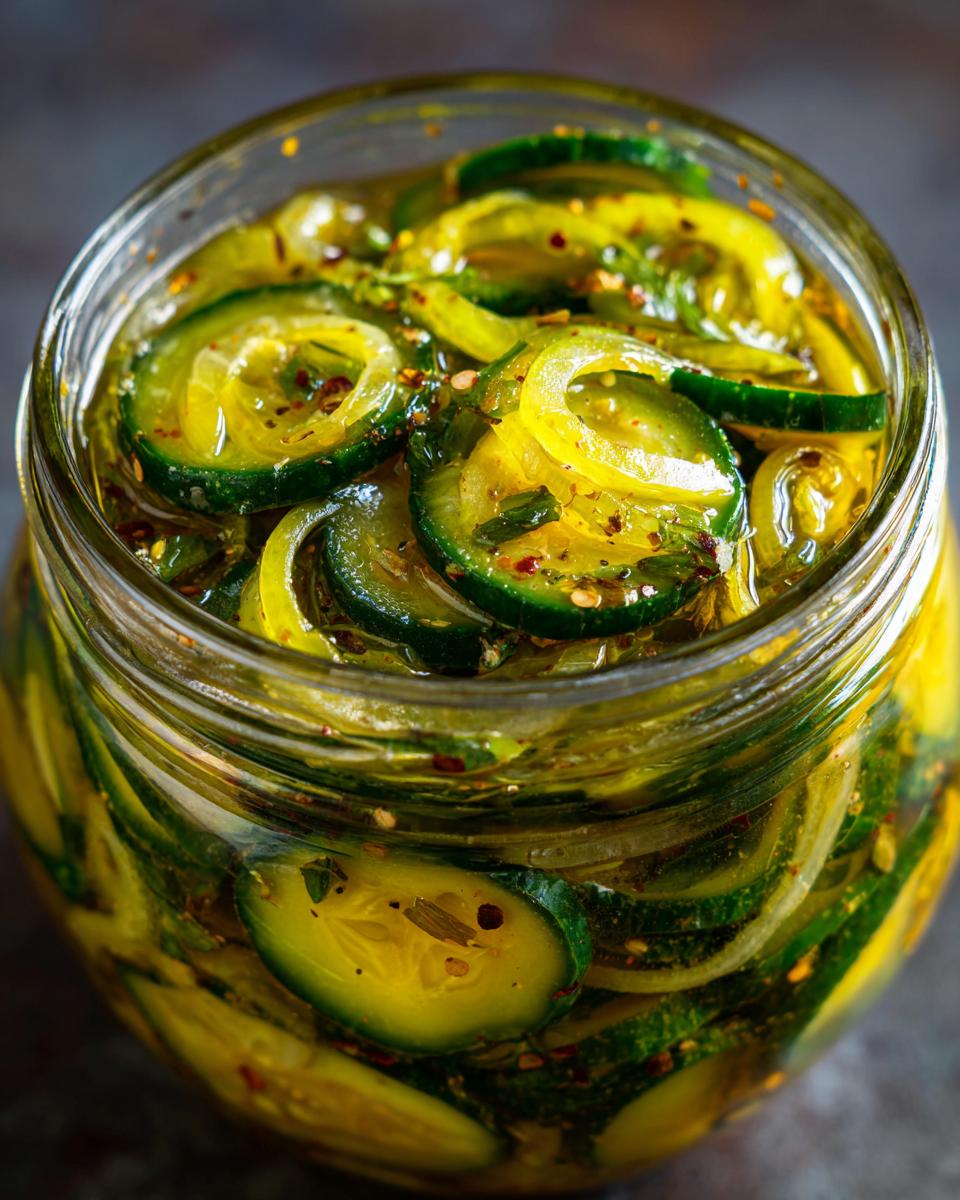
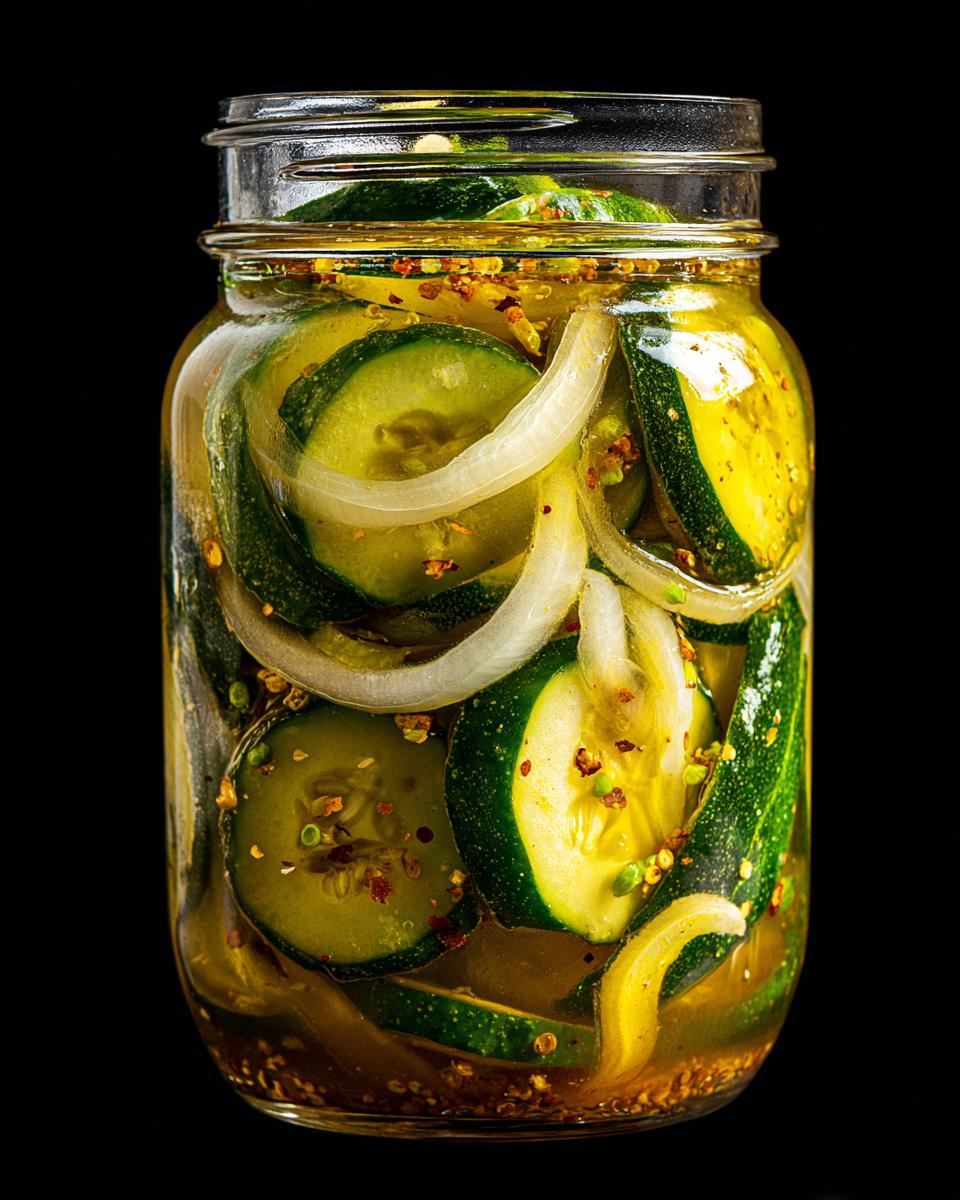
First things first, we need to get those cucumbers and onions prepped. You’ll toss your nice, thinly sliced cucumbers and onions together in a big bowl. Then, generously sprinkle all that kosher salt over them. Give it a good toss to make sure everything is coated. Let this sit for a good two hours – this is super important because it draws out all the extra water, which helps keep your pickles nice and crisp later on. After those two hours are up, you’re going to drain them really well and give them a good rinse under cold water to get rid of all that salt.
Creating the Perfect Pickling Brine
Now, let’s make that amazing sweet and tangy brine! Grab a nice big saucepan. We’re going to add all those lovely spices: the pickling spice (gotta have that!), the mustard seed, celery seed, turmeric for that gorgeous yellow hue, and just a pinch of red pepper flakes for a hint of warmth. Then, pour in your white vinegar and all that granulated sugar. Give it a good stir until the sugar is completely dissolved. Pop this onto medium-high heat and bring it just to a boil. Once it’s boiling and the sugar is all gone, you’ll reduce the heat and let it simmer gently for about 10 minutes. This lets all those flavors really meld together!

Thickening the Brine and Filling Jars
Almost there! Now, we need to make that brine nice and thick, just how we like it. In a tiny separate bowl, whisk together your cornstarch with about 1/4 cup of that hot, flavorful pickling liquid you just made. Make sure it’s totally smooth – no lumps allowed! Then, carefully pour this cornstarch mixture back into the main saucepan with the rest of the brine. Stir it constantly! You’ll notice it start to thicken up beautifully in just a couple of minutes. Once it’s nicely thickened, take the whole pot off the heat. Grab your sterilized jars (super important, don’t forget that step!) and ladle that hot pickle mixture in, leaving about half an inch of space at the top, what we call headspace. Seal those jars up tight.
Canning and Cooling Your Bread and Butter Pickles
Time to seal the deal! If you’re canning these beauties for longer storage, you’ll carefully place your filled jars into a boiling water bath. Let them process for exactly 10 minutes. After that, carefully lift the jars out – they’ll be hot! – and set them on a towel or a wire rack to cool completely. You’ll hear them start to *pop* as they seal, which is the most satisfying sound! If you’re not canning, you can just let them cool and pop them straight into the fridge. Either way, you’re just minutes away from pickle heaven!
Tips for Perfect Irresistible Bread And Butter Pickles
Okay, so you’ve got the recipe, but like with any good cooking, a few little tricks can make these pickles absolutely shine! Trust me, I’ve learned a thing or two over the years. For starters, when you’re picking out your cucumbers, try to grab the smaller, firmer ones if you can. They just seem to hold up better and give you that perfect crunch. If you can’t find pickling cucumbers specifically, don’t sweat it too much, but firmer is definitely better!
And that step where we salt the cucumbers and onions? Don’t skip it! Seriously, it’s the secret weapon for non-mushy pickles. It really draws out the excess water so you get a firmer, crisper bite. Also, make sure your jars are squeaky clean. I always give mine a good wash and then pop them in boiling water for a few minutes to sterilize them – it’s just good practice for anything you’re canning! Little things like this make a HUGE difference. For more awesome pickle inspiration, check out Sister Anastasia’s perfect pickled cucumbers – her crunch game is legendary!
A little note on the brine: sometimes, depending on your vinegar and sugar, the thickness can vary. If it seems a bit thin after adding the cornstarch, just simmer it a *tiny* bit longer, stirring constantly so it doesn’t scorch. And if you’re not canning, like maybe you’re just making a small batch to eat right away, storing them in the fridge in an airtight container, like these crisp refrigerator pickled vegetables, works like a charm too!
Variations and Serving Suggestions for Your Pickles
You know, one of the best things about these Irresistible Bread And Butter Pickles is how darn versatile they are! Once you’ve got your jars ready, the fun really begins. I love playing around with the spices – sometimes I’ll throw in a sprig of fresh dill or a few extra peppercorns into the jar just for kicks. A tiny bit of fresh ginger can add a lovely warmth too. If you’re feeling brave, a different type of vinegar, like apple cider vinegar, can give them a slightly different, fruity tang!
Now, how to serve them? Oh, the possibilities are endless! They are *phenomenal* on a classic cheeseburger, of course, or chopped up and mixed into a creamy potato salad. They’re also fantastic with pulled pork or on a grilled cheese sandwich – seriously, try it! For a fancier spread, chop them up and add them to a cheese board alongside some amazing bruschetta or even mix them into a hearty dish like a hamburger and potato bake. They just cut through the richness and add that perfect pop of flavor!
Storing Your Homemade Bread and Butter Pickles
Once your gorgeous jars of Irresistible Bread and Butter Pickles have cooled completely, it’s time to think about storing them. If you’ve properly canned them using the water bath method, these beauties can live happily in your pantry for up to a year! Just keep them in a cool, dark place – think a cupboard away from the oven or direct sunlight. If you decide to skip the canning step and just refrigerate them, they’ll last a good month or two in the fridge. Just make sure they have a tight-fitting lid!
Frequently Asked Questions about Bread and Butter Pickles
Got questions about whipping up these pickles? I totally get it! Making something from scratch can bring up a few things, but don’t worry, I’m here to help clear things up so you have the best experience possible. Here are some common things people ask!
Can I skip the canning process for these pickles?
Absolutely! If you’re just making a small batch to eat within a month or two, you can totally skip the water bath canning step. Just let the pickles cool completely after you make them, ladle them into clean jars, and pop them straight into the refrigerator. They’ll be delicious and the perfect tangy-sweet treat for your sandwiches!
How long do these homemade bread and butter pickles last?
That depends on whether you can them! Properly canned jars, stored in a cool, dark pantry, can last up to a year. They really hold up well! If you’re keeping them in the fridge (without canning), I’d say they’re best enjoyed within about 1 to 2 months. Honestly though, they usually disappear way faster than that!
Can I use different types of cucumbers for this recipe?
Great question! While traditional pickling cucumbers are usually the firmest and best for that super crisp texture, you can definitely use other types if that’s what you have. English cucumbers, or even the regular slicing cucumbers you find at the grocery store, will work. Just make sure they’re fresh and firm, and definitely don’t skip the salting step – it’s crucial to help them keep some of their crunch!
My pickles don’t seem thick enough, what did I do wrong?
Ooh, that can happen! Usually, it’s either not enough cornstarch or the cornstarch mixture wasn’t whisked smoothly. Make sure you use the full 2 tablespoons of cornstarch and whisk it really well with a bit of the hot pickling liquid until there are absolutely NO lumps before adding it back to the pot. Also, make sure you cook it for those couple of minutes while stirring constantly – that’s what activates the thickening power of the cornstarch!
Why are my pickles a bit mushy instead of crisp?
Mushy pickles are a sad sight! The biggest culprits are usually not letting the cucumbers and onions sit in the salt for the full 2 hours, or not rinsing them well enough afterwards. That salt bath is key to drawing out the water and firming them up. Also, using older or softer cucumbers can contribute to a less-than-crisp result. So, fresh, firm cukes and that full salting time are your best friends here!
Nutritional Information
Just a heads-up, the numbers below are estimates, so they can wiggle around a bit depending on the exact brands and ingredients you use. But this gives you a good idea of what you’re working with per serving:
- Serving Size: 2 tablespoons
- Calories: 30
- Sugar: 7g
- Sodium: 150mg
- Fat: 0g
- Carbohydrates: 8g

Irresistible Bread and Butter Pickles
- Total Time: 2 hours 35 minutes
- Yield: 6 pints 1x
- Diet: Vegetarian
Description
A simple recipe for sweet and tangy bread and butter pickles.
Ingredients
- 3 pounds cucumbers, thinly sliced
- 2 large onions, thinly sliced
- 1/2 cup kosher salt
- 1/4 cup pickling spice
- 1 teaspoon mustard seed
- 1 teaspoon celery seed
- 1/2 teaspoon turmeric
- 1/4 teaspoon red pepper flakes
- 3 cups white vinegar
- 2 cups granulated sugar
- 2 tablespoons cornstarch
Instructions
- In a large bowl, combine sliced cucumbers and onions. Sprinkle with kosher salt, toss to coat, and let stand for 2 hours. Drain and rinse thoroughly.
- In a large saucepan, combine pickling spice, mustard seed, celery seed, turmeric, and red pepper flakes.
- Add white vinegar, granulated sugar, and drained cucumbers and onions to the saucepan. Bring to a boil over medium-high heat, stirring until sugar dissolves.
- Reduce heat and simmer for 10 minutes.
- In a small bowl, whisk cornstarch with 1/4 cup of the hot pickling liquid until smooth. Pour the cornstarch mixture back into the saucepan, stirring constantly.
- Cook, stirring, until the mixture thickens, about 2-3 minutes.
- Remove from heat. Ladle hot pickles into sterilized jars, leaving 1/2-inch headspace. Seal jars.
- Process in a boiling water bath for 10 minutes. Remove jars and let cool completely.
Notes
- Ensure your jars are sterilized before filling.
- Store pickles in a cool, dark place.
- Prep Time: 2 hours 10 minutes
- Cook Time: 25 minutes
- Category: Condiments
- Method: Canning
- Cuisine: American
Nutrition
- Serving Size: 2 tablespoons
- Calories: 30
- Sugar: 7g
- Sodium: 150mg
- Fat: 0g
- Saturated Fat: 0g
- Unsaturated Fat: 0g
- Trans Fat: 0g
- Carbohydrates: 8g
- Fiber: 0g
- Protein: 0g
- Cholesterol: 0mg
Keywords: bread and butter pickles, homemade pickles, sweet pickles, canning, preserving, cucumber recipe