Oh, the 4th of July! It just screams fun, fireworks, and of course, delicious treats. Every year, I get so excited to whip up something special for our family gatherings, and this year, I’m sharing my absolute favorite, the Festive 4th Of July Rice Krispie Treats Recipe Delight! Seriously, these are a game-changer. They look amazing with those red and blue colors, and they taste like pure nostalgia. Plus, they are SO ridiculously easy to make, which means more time for grilling and less time stressing in the kitchen. If you’re looking for a crowd-pleaser that’s bursting with holiday spirit and made with love (and minimal effort!), you’ve found your winner.

Why You’ll Love This Festive 4th Of July Rice Krispie Treats Recipe Delight
Seriously, what’s not to love about these? They’re like a little slice of pure, unadulterated joy!
- Super Easy to Make: Think 20 minutes, tops! You can totally get the kids involved in this one, and they’ll have a blast.
- Minimal Ingredients: You probably already have most of this stuff in your pantry. Marshmallows, cereal, butter – the holy trinity of happy childhood snacks!
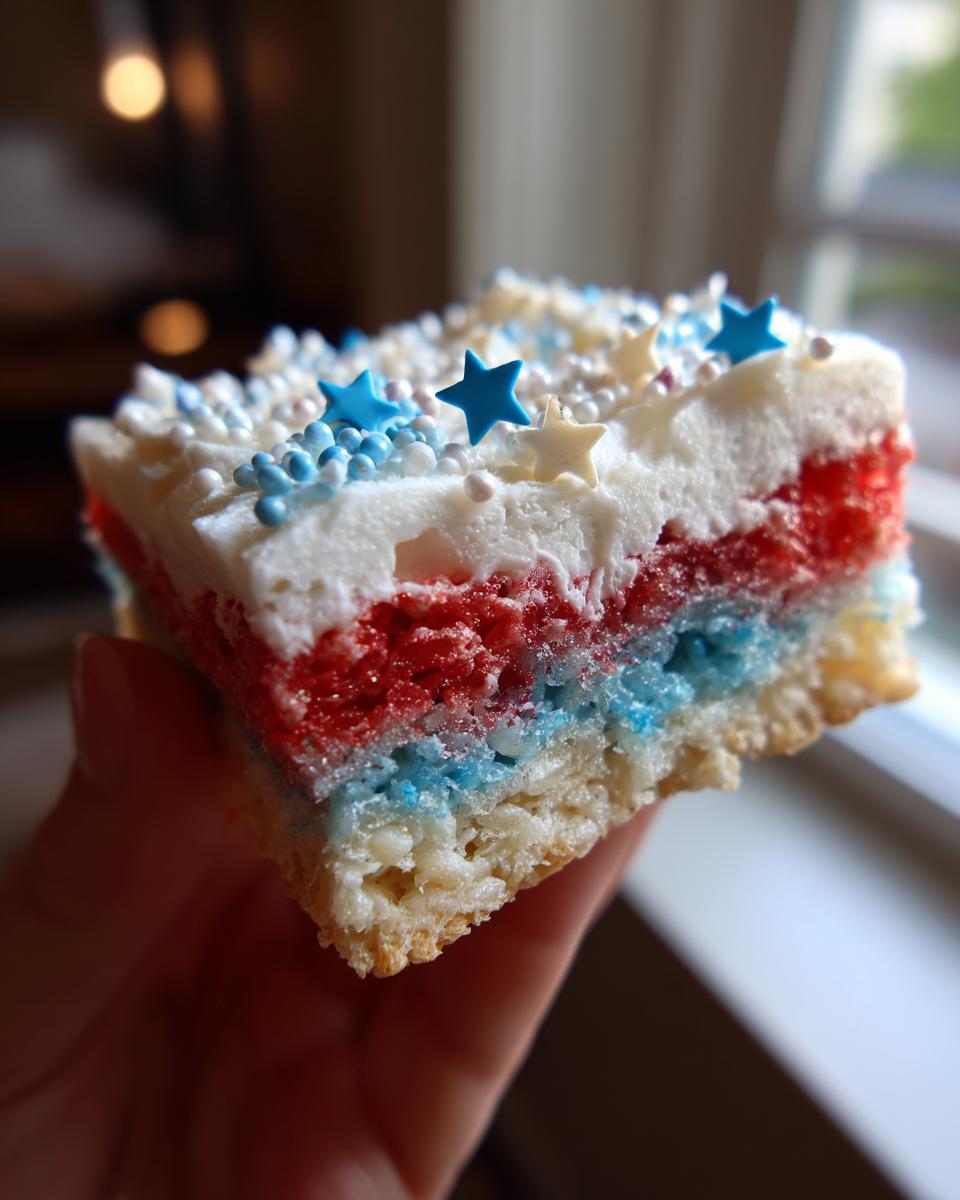
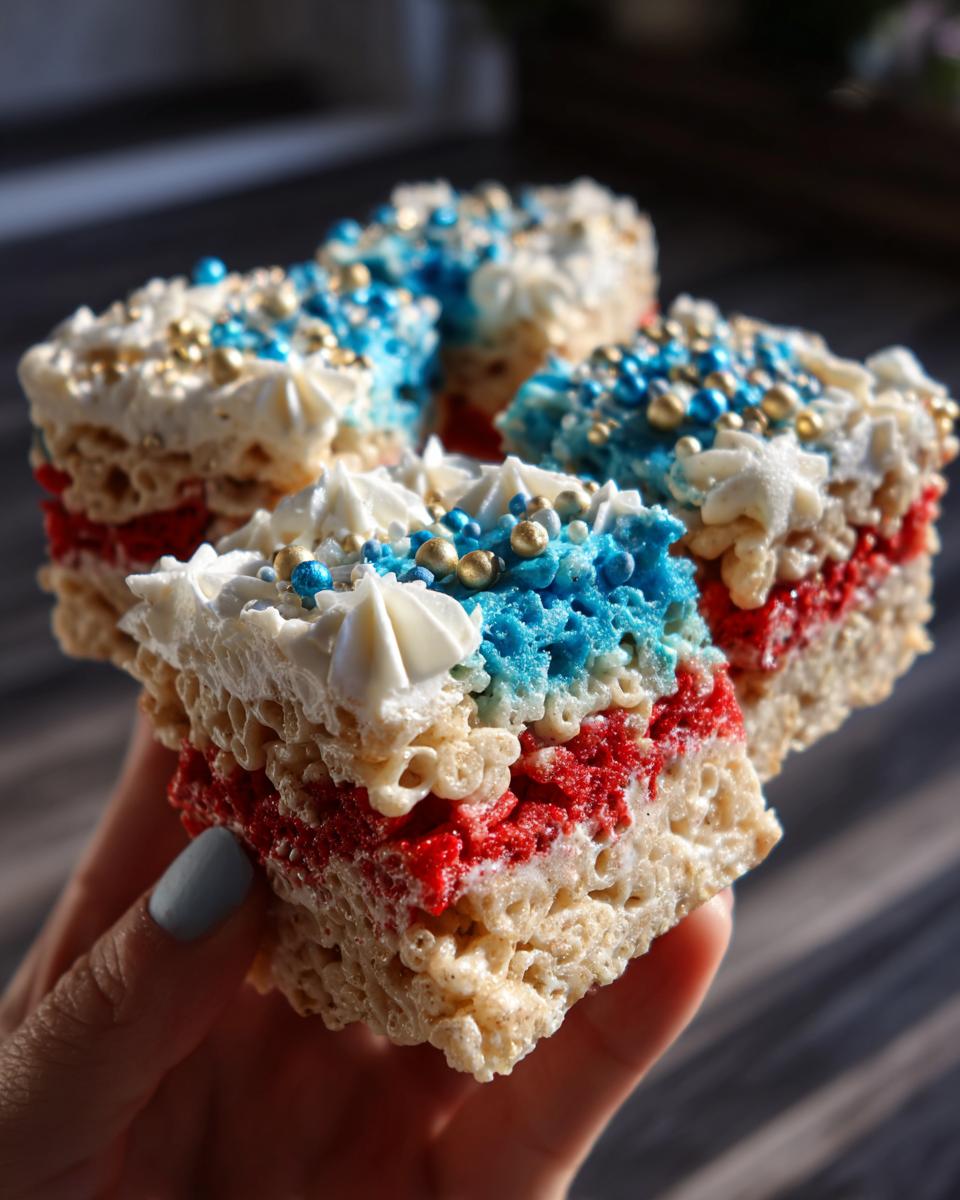
- Visually Stunning: Those red and blue layers just scream ‘Merica! They look so festive on a dessert table, and the star sprinkles add that extra little sparkle.
- Kid-Approved (and Adult-Approved!): Who doesn’t love a classic Rice Krispie treat? It’s that perfect chewy, sweet crunch that brings back all the best memories.
- No Baking Required: Score! This means no fussy oven temperatures or worrying about overbaking. Just melt, mix, press, and decorate. Perfect for those hot summer days.
- Incredibly Versatile: You can tweak the colors, add different sprinkles, or even mix in some white chocolate chips if you’re feeling extra.
Gather Your Ingredients for Festive 4th Of July Rice Krispie Treats
Alright, let’s get down to business! The beauty of these treats is that you really don’t need much. You’ll want to grab:
- 6 cups of Rice Krispies cereal – that classic crunchy goodness!
- 1 package (10 oz) of marshmallows. I usually go for the regular-sized ones, but mini work too, they just melt a tad faster.
- 3 tablespoons of unsalted butter. The unsalted kind lets you control the saltiness, though honestly, a little salt is never bad in my book!
- Red and blue food coloring. Get the gel kind if you can – they give you super vibrant colors without making the mixture watery.
- White frosting. I usually just grab a tub from the store for easy decorating, but homemade is always an option if you’re feeling fancy!
- Star sprinkles. Gotta have those stars for the 4th!
That’s really it! Simple, right? No fancy flours or obscure extracts needed here. Just good old-fashioned stuff to make some holiday magic.
Step-by-Step Guide to Making Festive 4th Of July Rice Krispie Treats
Okay, buckle up, because this is where the magic really happens! It’s surprisingly simple, and before you know it, you’ll have these adorable, festive treats ready to go. Remember, low and slow is the name of the game when we’re dealing with marshmallows!
Melting the Marshmallow Base
First things first, get a big pot or saucepan on the stove. We want to melt that butter over low heat – seriously, keep it low! Once the butter is all melted and looking smooth, toss in your marshmallows. Stir them gently and continuously until they’re completely gooey and smooth. This usually takes a few minutes, and you don’t want any burnt bits sticking to the bottom, so keep that heat low!
Creating the Festive Colors
Now, the fun part! Take your pot off the heat. You’ll want to divide that gooey marshmallow mixture into two bowls. So, eyeball it – roughly half in each bowl. This is where your red and blue food coloring comes in. Drip some red into one bowl and some blue into the other. Stir each one really well until the color is super vibrant and evenly distributed. Don’t be shy with the coloring if you want those bright, popping holiday shades!

Assembling and Pressing the Layers
Before you start pressing, make sure you’ve got your 9×13 inch pan ready. You’ll want to grease it really well. I find greasing my hands with a little butter or a quick spray of cooking oil works best for pressing the marshmallow mixture. Start by pressing the red layer evenly into the bottom of the pan. Then, carefully spoon the blue layer right on top and gently spread it out to cover the red, making sure you don’t mix the colors too much. You want those distinct layers!
Cooling and Cutting for Perfect Shapes
This is key, so listen up! You absolutely have to let these treats cool down completely. I usually let them hang out for at least an hour, maybe even longer. If you try to cut them when they’re still warm, they’ll just get all smooshed and stringy. Patience, my friends! Once they’re nice and cool, use a sharp knife (or a pizza cutter works wonders too!) to cut them into squares. For those super clean edges, wipe your knife clean between each cut.
Decorating for the 4th of July
Time to make them sparkle! Now that you’ve got your beautiful red and blue squares, grab that white frosting. You can pipe it on in little squiggles, drizzle it, or just spread it a bit haphazardly – it all looks festive! Then, while the frosting is still wet, sprinkle those adorable star sprinkles all over. You can make little star patterns or just go for a random sprinkle effect. It’s your masterpiece, so have fun with it!
Tips for the Best Festive 4th Of July Rice Krispie Treats
Okay, so making these treats is pretty straightforward, but let me tell you, a few little tricks can make them go from ‘good’ to ‘OMG, I need another one!’ First off, for the marshmallows, make sure you use fresh ones. Stale marshmallows just don’t get as melty and fluffy, and nobody wants a tough treat. And seriously, keep that heat super low when you’re melting them with the butter. If it gets too hot, they can scorch, and that funky burnt flavor is a total buzzkill. Trust me on this one! If you’re looking for other no-bake ideas, you might like these no-bake peanut butter bars too!
When it comes to those gorgeous red and blue colors, gel food coloring is your best friend. If you use the liquid kind, you might end up adding too much liquid, and your treats could get a little… well, mushy. Just a few drops of gel coloring will give you an amazing pop! Don’t be afraid to really stir it in to get an even color. For decorating, don’t overthink it! A little white frosting piped on with a zip-top baggie (just snip a teeny corner!) works just as well as fancy piping bags. And those star sprinkles? I like to press them in gently right after I pipe the frosting while it’s still wet so they really stick. Oh, and if your mixture gets *too* sticky when you’re pressing it into the pan – which sometimes happens even to me! – just re-grease your hands or spatula quickly. It makes all the difference.
Variations and Serving Suggestions
You know, these treats are pretty darn perfect as they are, but sometimes, you just gotta shake things up a bit, right? If you’re feeling adventurous, you could totally add a splash of vanilla extract right into the marshmallow mix for an extra layer of flavor. Or, for a bit of a fancy twist, try using white chocolate chips – stir them in right at the end with the cereal! If you want to go REALLY festive, imagine layering these with some other fun candies, or maybe even adding some edible glitter for extra sparkle. They look amazing next to some classic chocolate chip cookies or even fruity desserts. And a tall glass of cold lemonade or iced tea? Perfection!
Also, if you’re planning a big spread, check out some of my other favorite holiday-ish recipes! My coconut lemon curd thumbprint cookies are always a hit for a bright, fresh flavor, and if you’re dealing with a crowd that loves a bit more decadence, this honey pistachio baklava cheesecake is seriously out of this world. Just sayin’!
Storing and Reheating Your Festive Treats
Got leftovers? Lucky you! These festive treats are best stored at room temperature. Just pop them into an airtight container. If you’ve got a *really* warm kitchen though, popping them in the fridge can help them hold their shape a bit better. Just make sure they’re in a container or wrapped well so they don’t dry out. Honestly, they’re so good they usually disappear fast, but if you do need to reheat them, just a few seconds in the microwave on low power can bring back that soft, chewy texture. Be careful though, they heat up quick!
Frequently Asked Questions about Festive 4th Of July Rice Krispie Treats
Got questions about these fun little treats? I get it! It’s always good to iron out the details. Here are a few things people often ask:
Can I use mini marshmallows instead of the regular ones?
Oh, absolutely! Mini marshmallows are actually my secret weapon sometimes because they melt a little bit quicker than the big ones. Just make sure you stir them constantly over low heat so they don’t scorch. You’ll get the same delicious result!
How do I get those super clean cuts on my treats?
Ah, the clean cut! It’s all about patience and a little bit of prep. First, as we talked about, let them cool down *completely*. Like, give them a solid hour or more. Then, use a sharp knife that you’ve wiped clean between cuts. For really, really clean edges, you can even lightly grease or spray the knife blade. A pizza cutter can also work wonders!
Can I make these Festive 4th Of July Rice Krispie Treats ahead of time?
Definitely! In fact, I often make them the day before a party. Just store them in an airtight container at room temperature, and they stay perfectly soft and chewy. They really are best enjoyed within a day or two, though, so no need to make them *too* far in advance. If you ever need ideas for other types of baked goods, check out this recipe for crispy baked zucchini fries – it’s surprisingly good!
My red and blue colors ended up bleeding together a bit. What went wrong?
Don’t worry, this happens sometimes! It usually means the mixture was still a little too warm when you were pressing the second layer down, or you might have mixed them a bit too vigorously. Try to let the first layer set up just a tiny bit before adding the second, and press gently. Also, making sure your food coloring is a good quality gel kind helps keep the colors distinct!
Nutritional Information
Just a heads-up, the nutritional info for these yummy treats is an estimate, of course! It can totally change depending on the exact brands you use and how big you cut your squares. But generally, you’re looking at around 150 calories per treat, with about 5g of fat and 25g of carbs. It’s a pretty classic sweet snack profile!
Print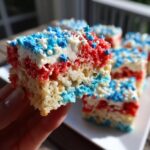
Festive 4th of July Rice Krispie Treats
- Total Time: 20 min
- Yield: 24 servings 1x
- Diet: Vegetarian
Description
Easy and festive Rice Krispie treats decorated for the 4th of July.
Ingredients
- 6 cups Rice Krispies cereal
- 1 package (10 oz) marshmallows
- 3 tablespoons butter
- Red and blue food coloring
- White frosting
- Star sprinkles
Instructions
- Melt butter in a large saucepan over low heat.
- Add marshmallows and stir until completely melted.
- Remove from heat.
- Add red food coloring to half of the marshmallow mixture and blue food coloring to the other half. Stir well.
- Grease a 9×13 inch pan.
- Press the red marshmallow mixture evenly into the pan.
- Press the blue marshmallow mixture evenly over the red layer.
- Let cool completely.
- Cut into squares.
- Decorate with white frosting and star sprinkles.
Notes
- For easier handling, grease your hands or a spatula with butter or cooking spray.
- Allow treats to cool fully before cutting for clean edges.
- Prep Time: 15 min
- Cook Time: 5 min
- Category: Dessert
- Method: No Bake
- Cuisine: American
Nutrition
- Serving Size: 1 treat
- Calories: 150
- Sugar: 18g
- Sodium: 50mg
- Fat: 5g
- Saturated Fat: 3g
- Unsaturated Fat: 2g
- Trans Fat: 0g
- Carbohydrates: 25g
- Fiber: 0g
- Protein: 1g
- Cholesterol: 10mg
Keywords: 4th of July, Rice Krispie treats, festive dessert, easy treats, no bake, holiday recipe